Setting Up a MongoDB Cluster Using Linux Instances
MongoDB is a highly scalable, open-source NoSQL database system, ideal for managing large amounts of data across distributed environments. It excels in high-volume data storage, supporting features like ad-hoc queries, indexing, load balancing, aggregation, and even server-side JavaScript execution. MongoDB organizes data into collections and documents rather than tables and rows, using key-value pairs within each document. This flexible data model, combined with its built-in replication and sharding capabilities, makes MongoDB a popular choice for applications requiring high availability and horizontal scaling.
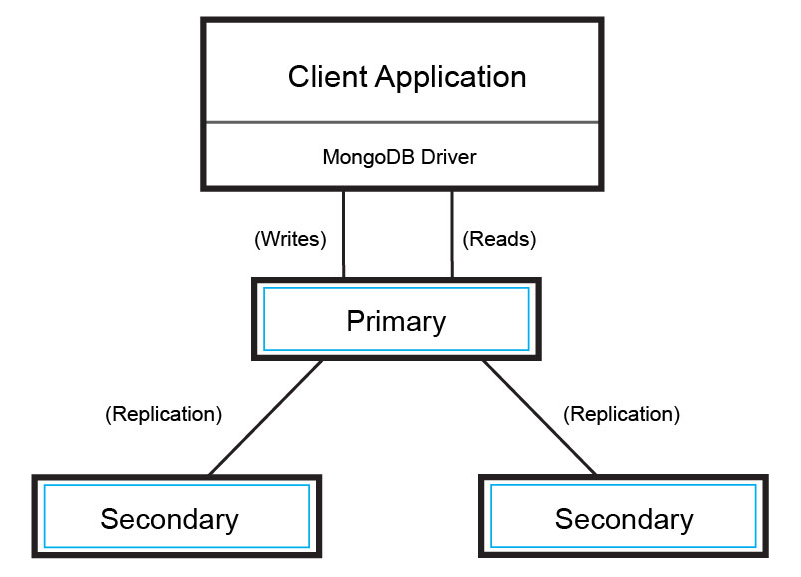
In this guide, we will walk you through setting up a three-node MongoDB replica set on Ubuntu 22.04, which can be extended further as needed.
Prerequisites
- Operating System: Ubuntu 22.04
- MongoDB Version: 4.4 (or latest stable version)
- At least 3 Linux servers (these will act as MongoDB instances for the replica set)
- Basic Linux administration skills (e.g., SSH access, using a text editor, and managing services)
Step 1: Update and Upgrade System Packages
Start by updating your system to ensure that all packages are up to date.
- To update and upgrade system packages, run:
sudo apt-get update -y && sudo apt-get upgrade -y
Step 2: Set Hostnames for Each Server
You’ll need to configure a descriptive hostname for each MongoDB node in the cluster.
- Check the current hostname of the server:
hostname
- Change the hostname using the following command:
sudo hostnamectl set-hostname myhostname
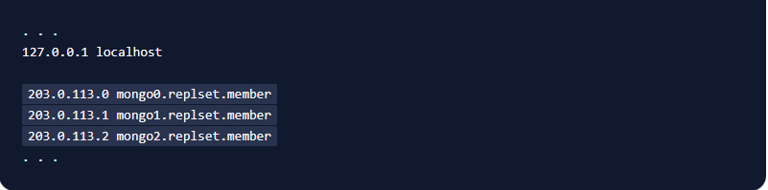
- Edit the
/etc/hostsfile on all three servers to ensure that each MongoDB instance can resolve the other nodes by their hostnames:
sudo vi /etc/hosts

Example content for /etc/hosts:
Configuring your servers with descriptive hostnames is advisable as it enhances clarity and ease of management.
Step 3: Import MongoDB GPG Key and Add Repository
To install MongoDB, you need to add its official APT repository.
- Import the MongoDB GPG key to verify package authenticity:
sudo wget -qO - https://www.mongodb.org/static/pgp/server-4.4.asc | sudo apt-key add -

- Add the MongoDB repository to your system’s APT sources:
echo "deb [ arch=amd64,arm64 ] https://repo.mongodb.org/apt/ubuntu $(lsb_release -sc)/mongodb-org/4.4 multiverse" | sudo tee /etc/apt/sources.list.d/mongodb-org-4.4.list

- Update package lists to include the MongoDB repository:
sudo apt-get update -y
Step 4: Install MongoDB
Install MongoDB and its dependencies:
- To install MongoDB, run:
sudo apt-get install mongodb-org -y
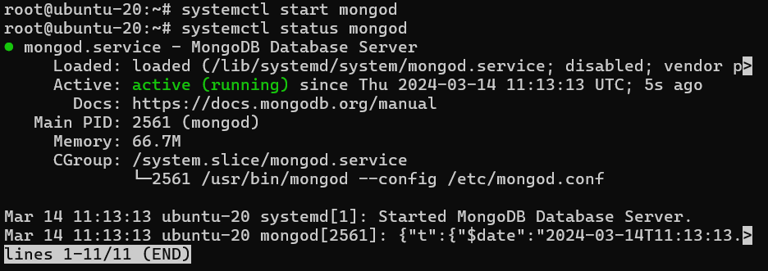
Step 5: Start MongoDB Service
Once MongoDB is installed, start the service:
- To start the MongoDB service and check its status, run:
sudo systemctl start mongod
sudo systemctl status mongod
- Enable MongoDB to start automatically at boot:
sudo systemctl enable mongod
Step 6: Verify MongoDB Installation
To ensure MongoDB is installed and running correctly, check its version:
- To check the MongoDB version, run:
sudo mongo --version

- You can also launch the MongoDB shell:
sudo mongo

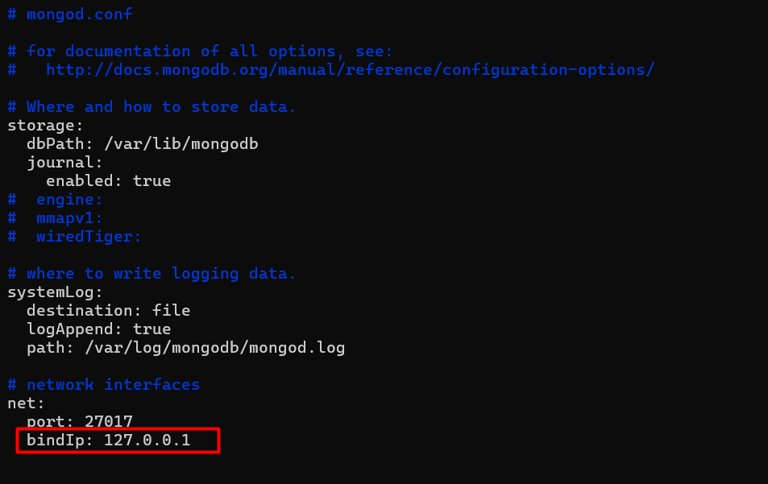
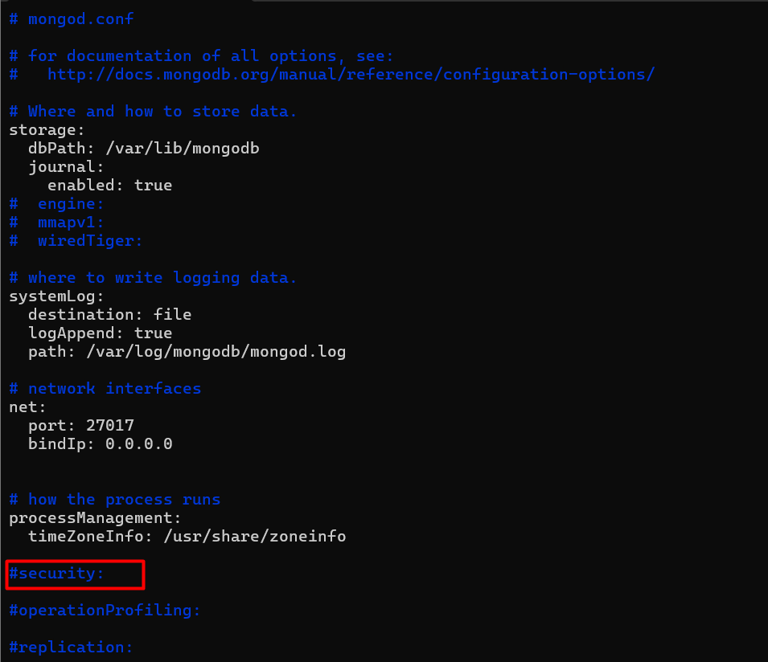
Step 7: Enable Replication in MongoDB Configuration
Edit the MongoDB configuration file to enable replication.
- Open the
/etc/mongod.conffile on each server:
sudo vi /etc/mongod.conf
- Change the bind IP address from
127.0.0.1to0.0.0.0to allow MongoDB to listen on all interfaces:

Create a Mongo Key File on Each Server
Step 8: Create Directory for Key Files
To create a directory for MongoDB key files, run:
sudo mkdir -p /etc/mongodb/key-files/
Step 9: Generate OpenSSL Key
Run the following command to create a secure key file:
sudo openssl rand -base64 756 > /etc/mongodb/key-files/mongo-key
Step 10: Copy Key File to Other Servers
Transfer the mongo-key file to the other servers using SFTP:
sftp root@your_IP_address
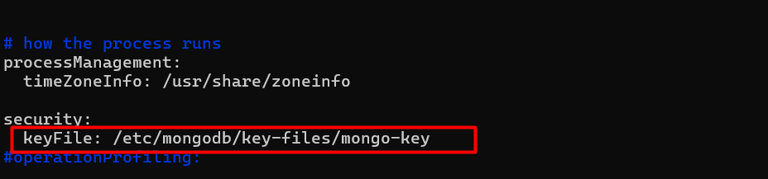
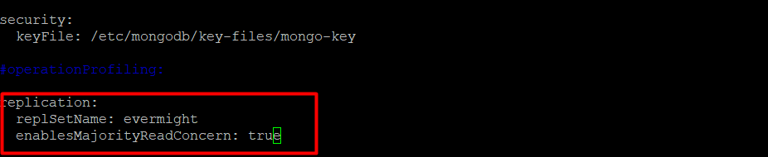
Enable Replication in MongoDB Configuration
Step 11: Edit the MongoDB Configuration File
Update the MongoDB configuration file on each server to enable security options:
sudo vi /etc/mongod.conf
Step 12: Add the Security Key
Uncomment the security section and add the key configuration:
keyFile: /etc/mongodb/key-files/mongo-key
Set Permissions for the Key File
Step 13: Configure File Permissions and Ownership
Ensure the key file has the correct permissions and ownership:
sudo chmod 400 /etc/mongodb/key-files/mongo-key
sudo chown -R mongodb:mongodb /etc/mongodb
Step 14: Stop the MongoDB Service
Stop the MongoDB service before making further changes:
sudo systemctl stop mongod
Set Up Replication on All Nodes
Step 15: Run MongoDB with Replication
Execute the following command on all nodes to enable replication:
sudo /usr/bin/mongod --replSet "rackbank" --config /etc/mongod.conf --fork

Step 16: Start the MongoDB Service
Start the MongoDB service on all nodes:
sudo systemctl start mongod
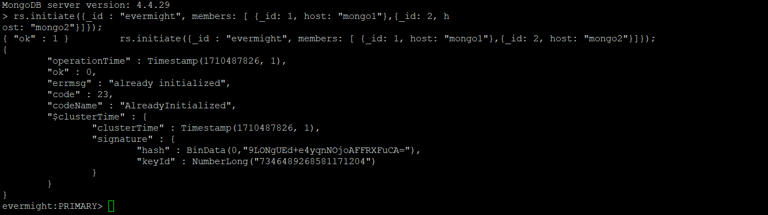
Initialize the Replica Set and Add Members
Step 17: Open the MongoDB Shell
Access the MongoDB shell:
sudo mongo
Step 18: Initiate Replication
Run the following command to initiate the replication process and add nodes:
mongo> rs.initiate({_id: "evermight", members: [{_id: 1, host: "mongo1"},{_id: 2, host: "mongo2"}] });
Conclusion
MongoDB is a robust, open-source NoSQL DBMS known for its flexibility and scalability, making it ideal for large-scale applications. By enabling replication, you ensure high availability and data redundancy across multiple servers.